PATIENT’S GUIDE TO CHRONIC DISEASE SELF MANAGEMENT WITH EXERCISE AND DIET
Exercises to strengthen the Core:
[row cols_nr=”2″][col size=”12″]
First we will focus on Neutral Spine, which is where we will always reference back to. To achieve Neutral Spine we will firs t lie in the supine position on the floor or on a mat. Neutral spine maintains three normal curves in your spine 1) in the back of the neck cervical spine 2) in your upper back thoracic spine and 3) your lower back lumbar spine. These three curves help to absorb stress and load on your body when you are sitting, moving or standing in place. It is in its strongest position when standing or sitting.
It may seem relaxing to let your body slump down and your posture may have changed to compensate for the pain you feel, but when you lose the normal curves of neutral spine, you actually put more stress on your body.
When exercising or doing any stabilization exercises you should always be in neutral spine
[/col][/row]
Finding neutral spine:
- Stand normally in front of a mirror with your hands on your hips, just below your
waist. - Now sway back and forth from heel to toe, than come to your center where the weight
feels evenly distributed. - Knees are soft, not locked and slightly bent
- Allow your low back to arch so your stomach juts forward, and your buttocks stick
out. Notice how your hands rotate forward. - Now go halfway between the forward and back positions.
- Now place one hand on the sternum/zyphoid process area and the other hand over
your navel then now lower and lift the ribcage then gently release. There should now
feel like there is more space to breathe. - Tighten the muscles around your stomach and buttocks so your lower back becomes
very flat. Notice how your hands rotate backward. - Keeping your pelvis in this neutral position, stand tall with your ears and shoulders
lined up over your hips and your shoulders and back down (shoulders should be
relaxed).
Finding neutral spine lying on back
- Lie on a mat or on the floor. The neutral spine position is where the spine is in ideal alignment and is found by envisioning the face of a clock on the abdomen
- 12:00 at the belly button and 6:00 at the pubic bone. Tilt your pelvis so your back is flat on the mat (envisions pushing your belly button though your body and out the back).
- Now exaggerate this motion the other way and pretend that your belly button (umbilicus) is being pulled by a string to create a curve (space) in your back that someone could put their hand under.
- Relax completely keeping a slight pelvic tilt and the abdominals slightly engaged. (Cough once to engage the transverse abdominals) while allowing the three natural curves to form.
- This is your neutral position.
- The neutral position within this range is the point where you identify the most comfortable. This position is emphasized and should be maintained for all movements performed during stabilization activities as well as all daily activities.
[row cols_nr=”2″][col size=”12″]

[/col][/row][col size=”12″][/col]
Transverse abdominus contraction.
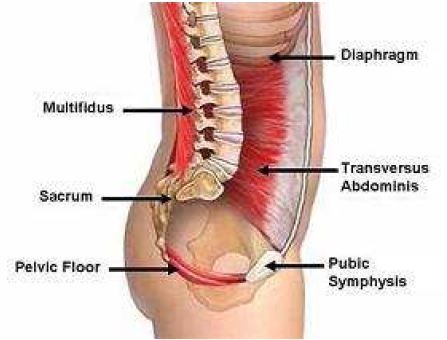
The key to core stabilization is learning to use the deep transverse muscles of your trunk. There are several muscles involved, but the first one to work on is your transverse abdominus. The transverse abdominus wraps around the front of your body like a corset. It’s the muscle you feel when you cough.
- Lie in the prone position on your back with your knees bent at a 45 degree angle and both feet shoulder width apart, flat on the floor.
- Make sure your head and neck are in alignment( place a towel or pillow under your head if needed) Maintain neutral spine and do not flatten your lower back into the mat, but keep the natural curve that we have been emphasizing.
- To contract the transverse abdominus, pull in your belly and imagine pulling your belly button back toward your spine.
- Now, lift your shoulder blades slightly off the floor (cross your arms in front if necessary). Hold this contraction for 5 to 10 seconds, than relax. Remember to keep breathing normally as you hold the contraction.
- Repeat 10-15 times
[row cols_nr=”2″]
[col size=”6″]

Picture 4.3 A: Starting position
[/col]
[col size=”6″]

Picture 4.3 B: Performing exercise
[/col]
[/row]
Pelvic Tilt on Ball
- Sit on the ball with your feet hip width apart and toes pointing straight ahead. Be sure your knees and hips are at 90 degree angles and your back is tall and straight.
- Cross your arms in front of you at shoulder height. Your shoulder blades should be pressed down and back to avoid slouching or forward rounding of the chest and shoulders.
- Begin the pelvic tilt by drawing up your pelvic floor, engaging your lower abdominals and tucking your pelvis backwards. Maintain a tall straight back and isolate the movement to focus on your hips, gluteus and lower abdominals.
- As you move into the pelvic tilt hold for 5 seconds and release. Repeat 6-8 times.
[row cols_nr=”2″][col size=”6″]

[/col][col size=”6″]

[/col][/row]
Bridging
- Lie on your back with your legs on the ball either from behind the knees or more advanced closer to the ankles.
- Tighten your transverse abdominus, and then raise your hips up off the floor as high asyou can till you are as flat as possible and squeeze the buttocks.
- Hold this position 5 to 10 seconds as you continue to breathe normally, and then lower yourself slowly to the floor.
- Lifting both hands by your side is advanced. See example below.
- Repeat the exercise 10 times. (If this exercise is too advanced then start with feet on the floor with knees bent and feet shoulder with apart)
[row cols_nr=”2″][col size=”6″]

[/col][col size=”6″]

[/col][/row]
[row cols_nr=”2″][col size=”12″]
Back Stabilization Exercise 1
· Lie on back, left knee bent.
Tighten abdominals and
buttocks, keeping back in
neutral position. Raise right
leg 12 inches, knee straight.
[/col][/row]
[row cols_nr=”2″][col size=”12″]

Hold 3 counts
[/col][/row][row cols_nr=”2″][col size=”12″]

·Lower leg. Repeat 10 times
[/col][/row][row cols_nr=”2″][col size=”12″]
Progress to making circles and squares with raised leg. 
[/col][/row]
·
Core stabilization exercise on ball
1. Lie on ball with hips parallel to floor and feet shoulder width apart
2. Cross arms across body or lift at side like model
3. Maintain a neutral spine and keep abdominals engaged during the whole ROM
4. Lower the hips down to the floor
5. Then thrust up while squeezing the glutes and return back to the starting position
6. Hold for 5 seconds
7. Repeat 6-10 times
[row cols_nr=”2″][col size=”6″]

[/col][col size=”6″]

[/col][/row]
Lying supine leg extension:
1) Lie on mat and maintain a neutral spine
2) Bent knees at a 90 and squeeze the ball between knees
3) Extend knees as close to 180 as possible
4) Then return back to the starting position
5) Repeat 10-15 times
[row cols_nr=”2″][col size=”6″]

[/col][col size=”6″]

[/col][/row]
5. Resistance Training
Frequency: 2-3 times per week
Intensity: Very light resistance to begin; with then gradually add more weight when needed.
Type: (Isometrics, free weights, Thera-Bands, cables, and tubing) Core stability balls.
Rest: Between exercises or sets is usually 60-90 seconds
Resistance Training is aimed to increase the functional strength of the individual suffering from chronic pain by making activities of daily living easier (e.g. climbing the stairs, sitting or standing with greater ease and lifting objects with less difficulty). First we need to focus on correcting muscle imbalances, improving posture and injury management and prevention and increasing the strength of the patient while building muscle. When working with Chronic Pain persons, you should focus mainly on the concentric movement of the exercise and not the eccentric phase. Focus the lifting, not the lowering phase of the exercise. Eventually as their strength and muscle fibers increase you can add more repetitions to gain endurance in the muscles. Resting between exercises can be achieved by alternating sides or changing muscle groups. The types of resistance training are Isometrics, resistance bands or thera bands, free weights and cables.
Isometrics:
They are exercises where you hold a contraction or push against a static object with force.
1) Isometric static abdominal hold2) Kneeling static plank
· Maintain neutral spine
· Knees bent at 90 angle
· Shoulders lifted
· Hold for 5-10 seconds
· Repeat 10-12 times
[row cols_nr=”2″][col size=”6″]

[/col][col size=”6″]

[/col][/row]
Free weights
Light to medium weights can be used to strengthen the body, but are usually added at a more advanced stage. You should also be shown how to us them properly with a qualified professional.
Thera-Bands
They can provide both positive and negative force on the muscles, improving strength range of motion, flexibility, muscle endurance and stability of muscle groups. They are very versatile and can be used almost anywhere from sitting in a chair to standing in your office. There are 7 levels that you can progress to. Most start with yellow or green and eventually progress to red or blue.
Lying Thera- Band pull-down
1. Lying supine (neutral spine) knees bent at a 45 degree angle
2. Arms parallel shoulders depressed and retracted
3. Keep elbows slightly bent and pull arms apart as far as you can without pain
4. Return to the starting position and repeat 15-20 times
[row cols_nr=”2″][col size=”6″]

[/col][col size=”6″]

[/col][/row]
[row cols_nr=”2″][col size=”6″]

[/col][col size=”6″]

[/col][/row]
1) Stand with feet shoulder width apart knees soft.
2) Assume standing neutral spine.
3) Scapula retracted and shoulders back and down.
4) Maintaining this position rotate from the left side to the right.
5) Lift the ball then lower back to the starting position.
6) Repeat 8 times.
7) Then switch directions and start from the right side to the left.